
Prerequisite: You have a GitLab account deployed on an AWS EC2 instance and have the necessary permissions to manage it.
Enable Job Artifacts and use an S3 bucket
### Job Artifacts
# gitlab_rails['artifacts_enabled'] = true
# gitlab_rails['artifacts_path'] = "/var/opt/gitlab/gitlab-rails/shared/artifacts"
###! Job artifacts Object Store###! Docs: https://docs.gitlab.com/ee/administration/job_artifacts.html#using-object-storage
# gitlab_rails['artifacts_object_store_enabled'] = false
# gitlab_rails['artifacts_object_store_proxy_download'] = false
# gitlab_rails['artifacts_object_store_remote_directory'] = "artifacts"
# gitlab_rails['artifacts_object_store_connection'] = {
#   'provider' => 'AWS',
#   'region' => 'eu-west-1',
#   'aws_access_key_id' => 'AWS_ACCESS_KEY_ID',
#   'aws_secret_access_key' => 'AWS_SECRET_ACCESS_KEY',
#   # # The below options configure an S3 compatible host instead of AWS
#   # 'aws_signature_version' => 4, # For creation of signed URLs. Set to 2 if provider does not support v4.
#   # 'endpoint' => 'https://s3.amazonaws.com', # default: nil - Useful for S3 compliant services such as DigitalOcean Spaces
#   # 'host' => 's3.amazonaws.com',
#   # 'path_style' => false # Use 'host/bucket_name/object' instead of 'bucket_name.host/object'
# }
gitlab_rails['artifacts_enabled'] = true
gitlab_rails['artifacts_object_store_enabled'] = true
gitlab_rails['artifacts_object_store_remote_directory'] = "<gitlab-artifacts-bucket>"
gitlab_rails['artifacts_object_store_connection'] = {
  'provider' => 'AWS',
  'region' => 'ap-east-1',
  'use_iam_profile' => true,
}
Use roles to grant permissions to applications running on Amazon EC2 instances.
To set up an instance profile:
-
Create an IAM role with the necessary permissions. The following example is a role for an S3 bucket named
test-bucket:JSONCopy to clipboard
{ "Version": "2012-10-17", "Statement": [ { "Effect": "Allow", "Action": [ "s3:PutObject", "s3:GetObject", "s3:DeleteObject" ], "Resource": "arn:aws:s3:::artifacts-bucket/*" }, { "Effect": "Allow", "Action": [ "s3:ListBucket" ], "Resource": "arn:aws:s3:::artifacts-bucket" } ] } -
Attach this role to the EC2 instance hosting your GitLab instance.
-
Set the
use_iam_profileGitLab configuration option totrue.
Load configuration and restart gitlab
# Load configuration
sudo gitlab-ctl reconfigure
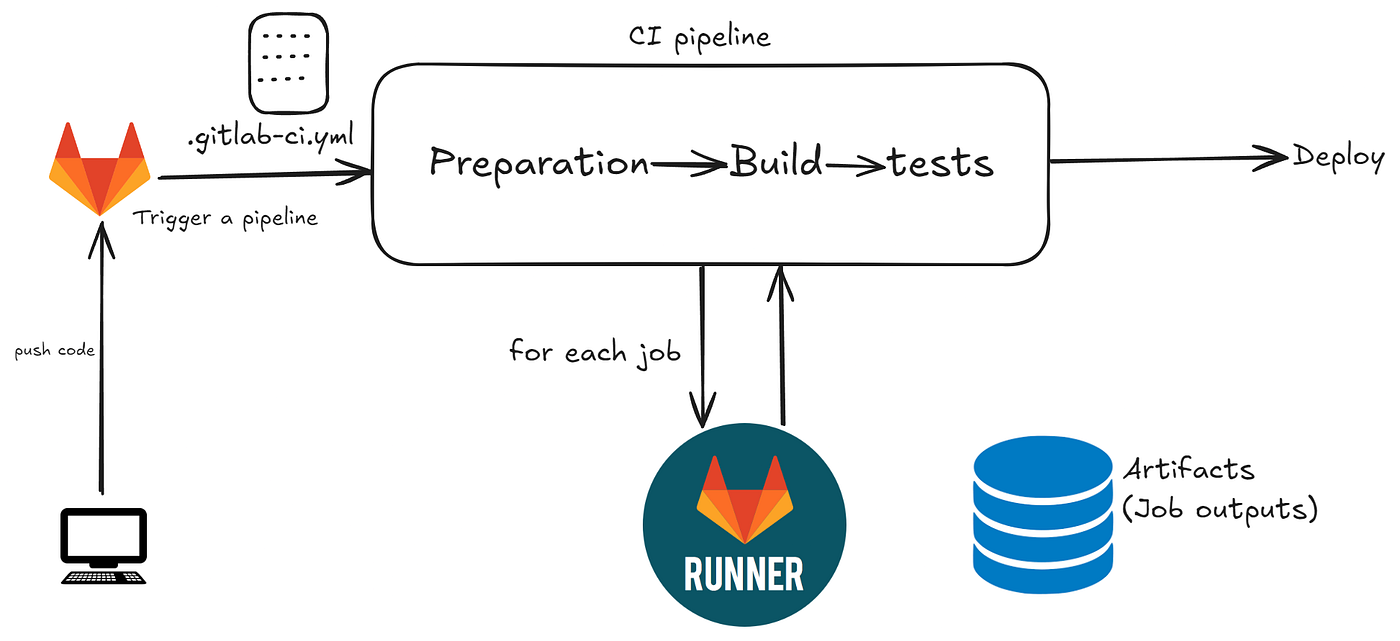
# RestartRunners – instance runner/shared runners
Three runner types
GitLab Runner has the following types of runners, which are available based on who you want to have access:
- Instance runners are available to all groups and projects in a GitLab instance.
- Group runners are available to all projects and subgroups in a group.
- Project runners are associated with specific projects. Typically, project runners are used by one project at a time.
To create an instance runner:
- On the left sidebar, at the bottom, select Admin.
- Select CI/CD > Runners.
- Select New instance runner.
- Select the operating system where GitLab Runner is installed.
- In the Tags section, in the Tags field, enter the job tags to specify jobs the runner can run. If there are no job tags for this runner, select Run untagged.
Run GitLab Runner in a container
run
docker run -d --name gitlab-runner --restart always \
  -v /app/gitlab-runner/config:/etc/gitlab-runner \
  -v /var/run/docker.sock:/var/run/docker.sock \
  gitlab/gitlab-runner:v18.2.0
register
$ sudo docker exec -it gitlab-runner /bin/bash  # Enter the runner container and register.

$ gitlab-runner register  --url <URL> --token <TOKEN> # Register in the runner container
Enter an executor:
docker

Enter the default Docker image (for example, ruby:3.3):
alpine:latest
Comments
I was recommended this website by my cousin I am not sure whether this post is written by him as nobody else know such detailed about my trouble You are amazing Thanks
Hi my loved one I wish to say that this post is amazing nice written and include approximately all vital infos Id like to peer more posts like this