
Ensuring all client requests are handled properly
You now have a good sense of how to make pods shut down cleanly. Now, we’ll look at the pod’s lifecycle from the perspective of the pod’s clients (clients consuming the service the pod is providing). This is important to understand if you don’t want clients to run into problems when you scale pods up or down.
It goes without saying that you want all client requests to be handled properly. You obviously don’t want to see broken connections when pods are starting up or shutting down. By itself, Kubernetes doesn’t prevent this from happening. Your app needs to follow a few rules to prevent broken connections. First, let’s focus on making sure all connections are handled properly when the pod starts up.
1. Preventing broken client connections when a pod is starting up
Ensuring each connection is handled properly at pod startup is simple if you understand how Services and service Endpoints work. When a pod is started, it’s added as an endpoint to all the Services, whose label selector matches the pod’s labels. As you may remember from chapter 5, the pod also needs to signal to Kubernetes that it’s ready. Until it is, it won’t become a service endpoint and therefore won’t receive any requests from clients.
If you don’t specify a readiness probe in your pod spec, the pod is always considered ready. It will start receiving requests almost immediately—as soon as the first kube-proxy updates the iptables rules on its node and the first client pod tries to connect to the service. If your app isn’t ready to accept connections by then, clients will see “connection refused” types of errors.
All you need to do is make sure that your readiness probe returns success only when your app is ready to properly handle incoming requests. A good first step is to add an HTTP GET readiness probe and point it to the base URL of your app. In many cases that gets you far enough and saves you from having to implement a special readiness endpoint in your app.
2. Preventing broken connections during pod shut-down
Now let’s see what happens at the other end of a pod’s life—when the pod is deleted and its containers are terminated. We’ve already talked about how the pod’s containers should start shutting down cleanly as soon they receive the SIGTERM signal (or when its pre-stop hook is executed). But does that ensure all client requests are handled properly?
How should the app behave when it receives a termination signal? Should it continue to accept requests? What about requests that have already been received but haven’t completed yet? What about persistent HTTP connections, which may be in between requests, but are open (when no active request exists on the connection)? Before we can answer those questions, we need to take a detailed look at the chain of events that unfolds across the cluster when a Pod is deleted.
2.1 Understanding the sequence of events occurring at pod deletion
In chapter 11 we took an in-depth look at what components make up a Kubernetes cluster. You need to always keep in mind that those components run as separate processes on multiple machines. They aren’t all part of a single big monolithic process. It takes time for all the components to be on the same page regarding the state of the cluster. Let’s explore this fact by looking at what happens across the cluster when a Pod is deleted.
When a request for a pod deletion is received by the API server, it first modifies the state in etcd and then notifies its watchers of the deletion. Among those watchers are the Kubelet and the Endpoints controller. The two sequences of events, which happen in parallel (marked with either A or B), are shown in figure 17.7.
Sequence of events that occurs when a Pod is deleted =>
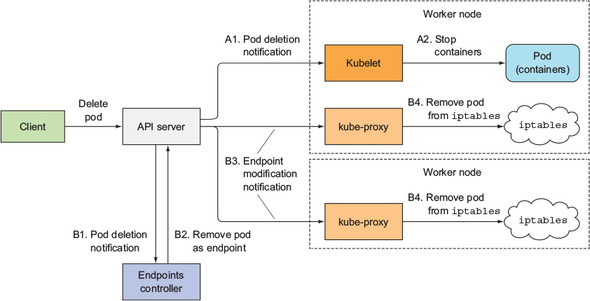
In the A sequence of events, you’ll see that as soon as the Kubelet receives the notification that the pod should be terminated, it initiates the shutdown sequence as explained in section 17.2.5 (run the pre-stop hook, send SIGTERM, wait for a period of time, and then forcibly kill the container if it hasn’t yet terminated on its own). If the app responds to the SIGTERM by immediately ceasing to receive client requests, any client trying to connect to it will receive a Connection Refused error. The time it takes for this to happen from the time the pod is deleted is relatively short because of the direct path from the API server to the Kubelet.
Now, let’s look at what happens in the other sequence of events—the one leading up to the pod being removed from the iptables rules (sequence B in the figure). When the Endpoints controller (which runs in the Controller Manager in the Kubernetes Control Plane) receives the notification of the Pod being deleted, it removes the pod as an endpoint in all services that the pod is a part of. It does this by modifying the Endpoints API object by sending a REST request to the API server. The API server then notifies all clients watching the Endpoints object. Among those watchers are all the kube-proxies running on the worker nodes. Each of these proxies then updates the iptables rules on its node, which is what prevents new connections from being forwarded to the terminating pod. An important detail here is that removing the iptables rules has no effect on existing connections—clients who are already connected to the pod will still send additional requests to the pod through those existing connections.
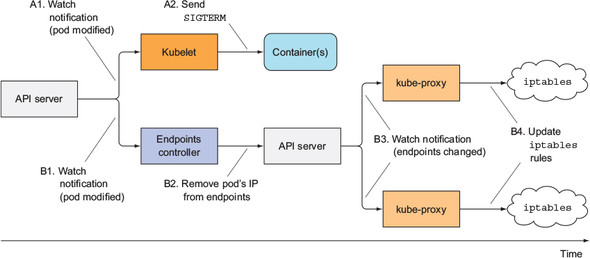
Both of these sequences of events happen in parallel. Most likely, the time it takes to shut down the app’s process in the pod is slightly shorter than the time required for the iptables rules to be updated. The chain of events that leads to iptables rules being updated is considerably longer (see figure 17.8), because the event must first reach the Endpoints controller, which then sends a new request to the API server, and then the API server must notify the kube-proxy before the proxy finally modifies the iptables rules. A high probability exists that the SIGTERM signal will be sent well before the iptables rules are updated on all nodes.
Timeline of events when pod is deleted =>
The end result is that the pod may still receive client requests after it was sent the termination signal. If the app closes the server socket and stops accepting connections immediately, this will cause clients to receive “Connection Refused” types of errors (similar to what happens at pod startup if your app isn’t capable of accepting connections immediately and you don’t define a readiness probe for it).
2.2 Solving the problem
Googling solutions to this problem makes it seem as though adding a readiness probe to your pod will solve the problem. Supposedly, all you need to do is make the readiness probe start failing as soon as the pod receives the SIGTERM. This is supposed to cause the pod to be removed as the endpoint of the service. But the removal would happen only after the readiness probe fails for a few consecutive times (this is configurable in the readiness probe spec). And, obviously, the removal then still needs to reach the kube-proxy before the pod is removed from iptables rules.
In reality, the readiness probe has absolutely no bearing on the whole process at all. The Endpoints controller removes the pod from the service Endpoints as soon as it receives notice of the pod being deleted (when the deletionTimestamp field in the pod’s spec is no longer null). From that point on, the result of the readiness probe is irrelevant.
What’s the proper solution to the problem? How can you make sure all requests are handled fully?
It’s clear the pod needs to keep accepting connections even after it receives the termination signal up until all the kube-proxies have finished updating the iptables rules. Well, it’s not only the kube-proxies. There may also be Ingress controllers or load balancers forwarding connections to the pod directly, without going through the Service (iptables). This also includes clients using client-side load-balancing. To ensure none of the clients experience broken connections, you’d have to wait until all of them somehow notify you they’ll no longer forward connections to the pod.
That’s impossible, because all those components are distributed across many different computers. Even if you knew the location of every one of them and could wait until all of them say it’s okay to shut down the pod, what do you do if one of them doesn’t respond? How long do you wait for the response? Remember, during that time, you’re holding up the shut-down process.
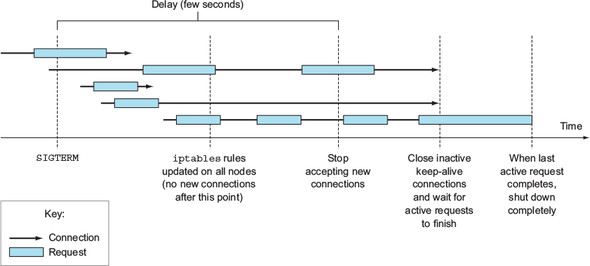
The only reasonable thing you can do is wait for a long-enough time to ensure all the proxies have done their job. But how long is long enough? A few seconds should be enough in most situations, but there’s no guarantee it will suffice every time. When the API server or the Endpoints controller is overloaded, it may take longer for the notification to reach the kube-proxy. It’s important to understand that you can’t solve the problem perfectly, but even adding a 5- or 10-second delay should improve the user experience considerably. You can use a longer delay, but don’t go overboard, because the delay will prevent the container from shutting down promptly and will cause the pod to be shown in lists long after it has been deleted, which is always frustrating to the user deleting the pod.
2.3 Wrapping up this section
To recap—properly shutting down an application includes these steps:
- Wait for a few seconds, then stop accepting new connections.
- Close all keep-alive connections not in the middle of a request.
- Wait for all active requests to finish.
- Then shut down completely.
To understand what’s happening with the connections and requests during this process, examine figure 17.9 carefully.
Properly handling existing and new connections after receiving a termination signal =>
Not as simple as exiting the process immediately upon receiving the termination signal, right? Is it worth going through all this? That’s for you to decide. But the least you can do is add a pre-stop hook that waits a few seconds, like the one in the following listing, perhaps.
A pre-stop hook for preventing broken connections =>
    lifecycle:
      preStop:
        exec:
          command:
          - sh
          - -c
          - "sleep 5"
This way, you don’t need to modify the code of your app at all. If your app already ensures all in-flight requests are processed completely, this pre-stop delay may be all you need.
Comments
Hey this is somewhat of off topic but I was wanting to know iff blogs use WYSIWYG editors or if you have tto manually code with HTML. I’m starting a blog soon but have no coding skills so I wanted to get guidance from someone with experience. Any help would be enormously appreciated!
A Markdown plugin editor. Sorry for the late reply.